Antique Kerosene Lighting
Home
Aladdin Lamps -
New Table Lamps
New Shelf & Bracket Lamps
New Hanging Lamps
Vintage Aladdin Lamps
Antique Table & Shelf Lamps
Antique Hanging Lamps
Antique Floor Lamps
Unusual Aladdin Lamps
Lamp Shades
Aladdin Glass & Parchment Shades
Aladdin Vintage Glass Shades
Antique Aladdin Shades
Other Glass Shades To Fit Aladdin Lamps
Parts
New Burners, Parts & Accessories for Aladdin Lamps
No name parts for Aladdin lamps
Burners, wicks & chimneys for oil lamps
Misc Lamp Parts for Oil Lamps
Kerosene heater parts
Parts for kerosene refrigerators
Parts for lanterns
Vintage & Antique Fonts,HL Parts,
Old Parts-Aladdin
Old Parts - Misc
Coleman Lamp & Lantern Parts
Other Devices & Glass
Aladdin Antique Electric Lamps
Other Antique & Vintage Electric Lamps
Misc Antique & Vintage Oil Lamps
Coleman Lamps,Lanterns,Stoves & Irons
Angle Lamps & Glass
Lanterns & Glass - New & Old
Other Lighting Glass
Kerosene Heaters
Clearance Sale Items
Miscellaneous
News & Coming Events
Rentals (Movie Props etc.)
Decorating with Antique Lamps
Lamp Terminology
Flatwick Burners
User Instruction Sheets for Aladdin Lamps
Exploded Burner Diagrams
OT Manual
Reference Books & Materials
Ephemera
Prices,Quotes,Orders,Shipping,Payment
Contact
FAQ's & TIPS - for your Aladdin
Info Video
2018 Aladdin Catalog
Antique Kerosene Lighting
Home
/
Aladdin Lamps -
/
New Table Lamps
New Shelf & Bracket Lamps
New Hanging Lamps
Vintage Aladdin Lamps
Antique Table & Shelf Lamps
Antique Hanging Lamps
Antique Floor Lamps
Unusual Aladdin Lamps
Lamp Shades
/
Aladdin Glass & Parchment Shades
Aladdin Vintage Glass Shades
Antique Aladdin Shades
Other Glass Shades To Fit Aladdin Lamps
Parts
/
New Burners, Parts & Accessories for Aladdin Lamps
No name parts for Aladdin lamps
Burners, wicks & chimneys for oil lamps
Misc Lamp Parts for Oil Lamps
Kerosene heater parts
Parts for kerosene refrigerators
Parts for lanterns
Vintage & Antique Fonts,HL Parts,
Old Parts-Aladdin
Old Parts - Misc
Coleman Lamp & Lantern Parts
Other Devices & Glass
/
Aladdin Antique Electric Lamps
Other Antique & Vintage Electric Lamps
Misc Antique & Vintage Oil Lamps
Coleman Lamps,Lanterns,Stoves & Irons
Angle Lamps & Glass
Lanterns & Glass - New & Old
Other Lighting Glass
Kerosene Heaters
Clearance Sale Items
Miscellaneous
/
News & Coming Events
Rentals (Movie Props etc.)
Decorating with Antique Lamps
Lamp Terminology
Flatwick Burners
User Instruction Sheets for Aladdin Lamps
Exploded Burner Diagrams
OT Manual
Reference Books & Materials
Ephemera
Prices,Quotes,Orders,Shipping,Payment
Contact
FAQ's & TIPS - for your Aladdin
Info Video
2018 Aladdin Catalog
Antique Kerosene Lighting
Bringing Antique Lighting Back To Life
Exploded Burner Diagrams
Antique Kerosene Lighting
Home
/
Aladdin Lamps -
/
New Table Lamps
New Shelf & Bracket Lamps
New Hanging Lamps
Vintage Aladdin Lamps
Antique Table & Shelf Lamps
Antique Hanging Lamps
Antique Floor Lamps
Unusual Aladdin Lamps
Lamp Shades
/
Aladdin Glass & Parchment Shades
Aladdin Vintage Glass Shades
Antique Aladdin Shades
Other Glass Shades To Fit Aladdin Lamps
Parts
/
New Burners, Parts & Accessories for Aladdin Lamps
No name parts for Aladdin lamps
Burners, wicks & chimneys for oil lamps
Misc Lamp Parts for Oil Lamps
Kerosene heater parts
Parts for kerosene refrigerators
Parts for lanterns
Vintage & Antique Fonts,HL Parts,
Old Parts-Aladdin
Old Parts - Misc
Coleman Lamp & Lantern Parts
Other Devices & Glass
/
Aladdin Antique Electric Lamps
Other Antique & Vintage Electric Lamps
Misc Antique & Vintage Oil Lamps
Coleman Lamps,Lanterns,Stoves & Irons
Angle Lamps & Glass
Lanterns & Glass - New & Old
Other Lighting Glass
Kerosene Heaters
Clearance Sale Items
Miscellaneous
/
News & Coming Events
Rentals (Movie Props etc.)
Decorating with Antique Lamps
Lamp Terminology
Flatwick Burners
User Instruction Sheets for Aladdin Lamps
Exploded Burner Diagrams
OT Manual
Reference Books & Materials
Ephemera
Prices,Quotes,Orders,Shipping,Payment
Contact
FAQ's & TIPS - for your Aladdin
Info Video
2018 Aladdin Catalog
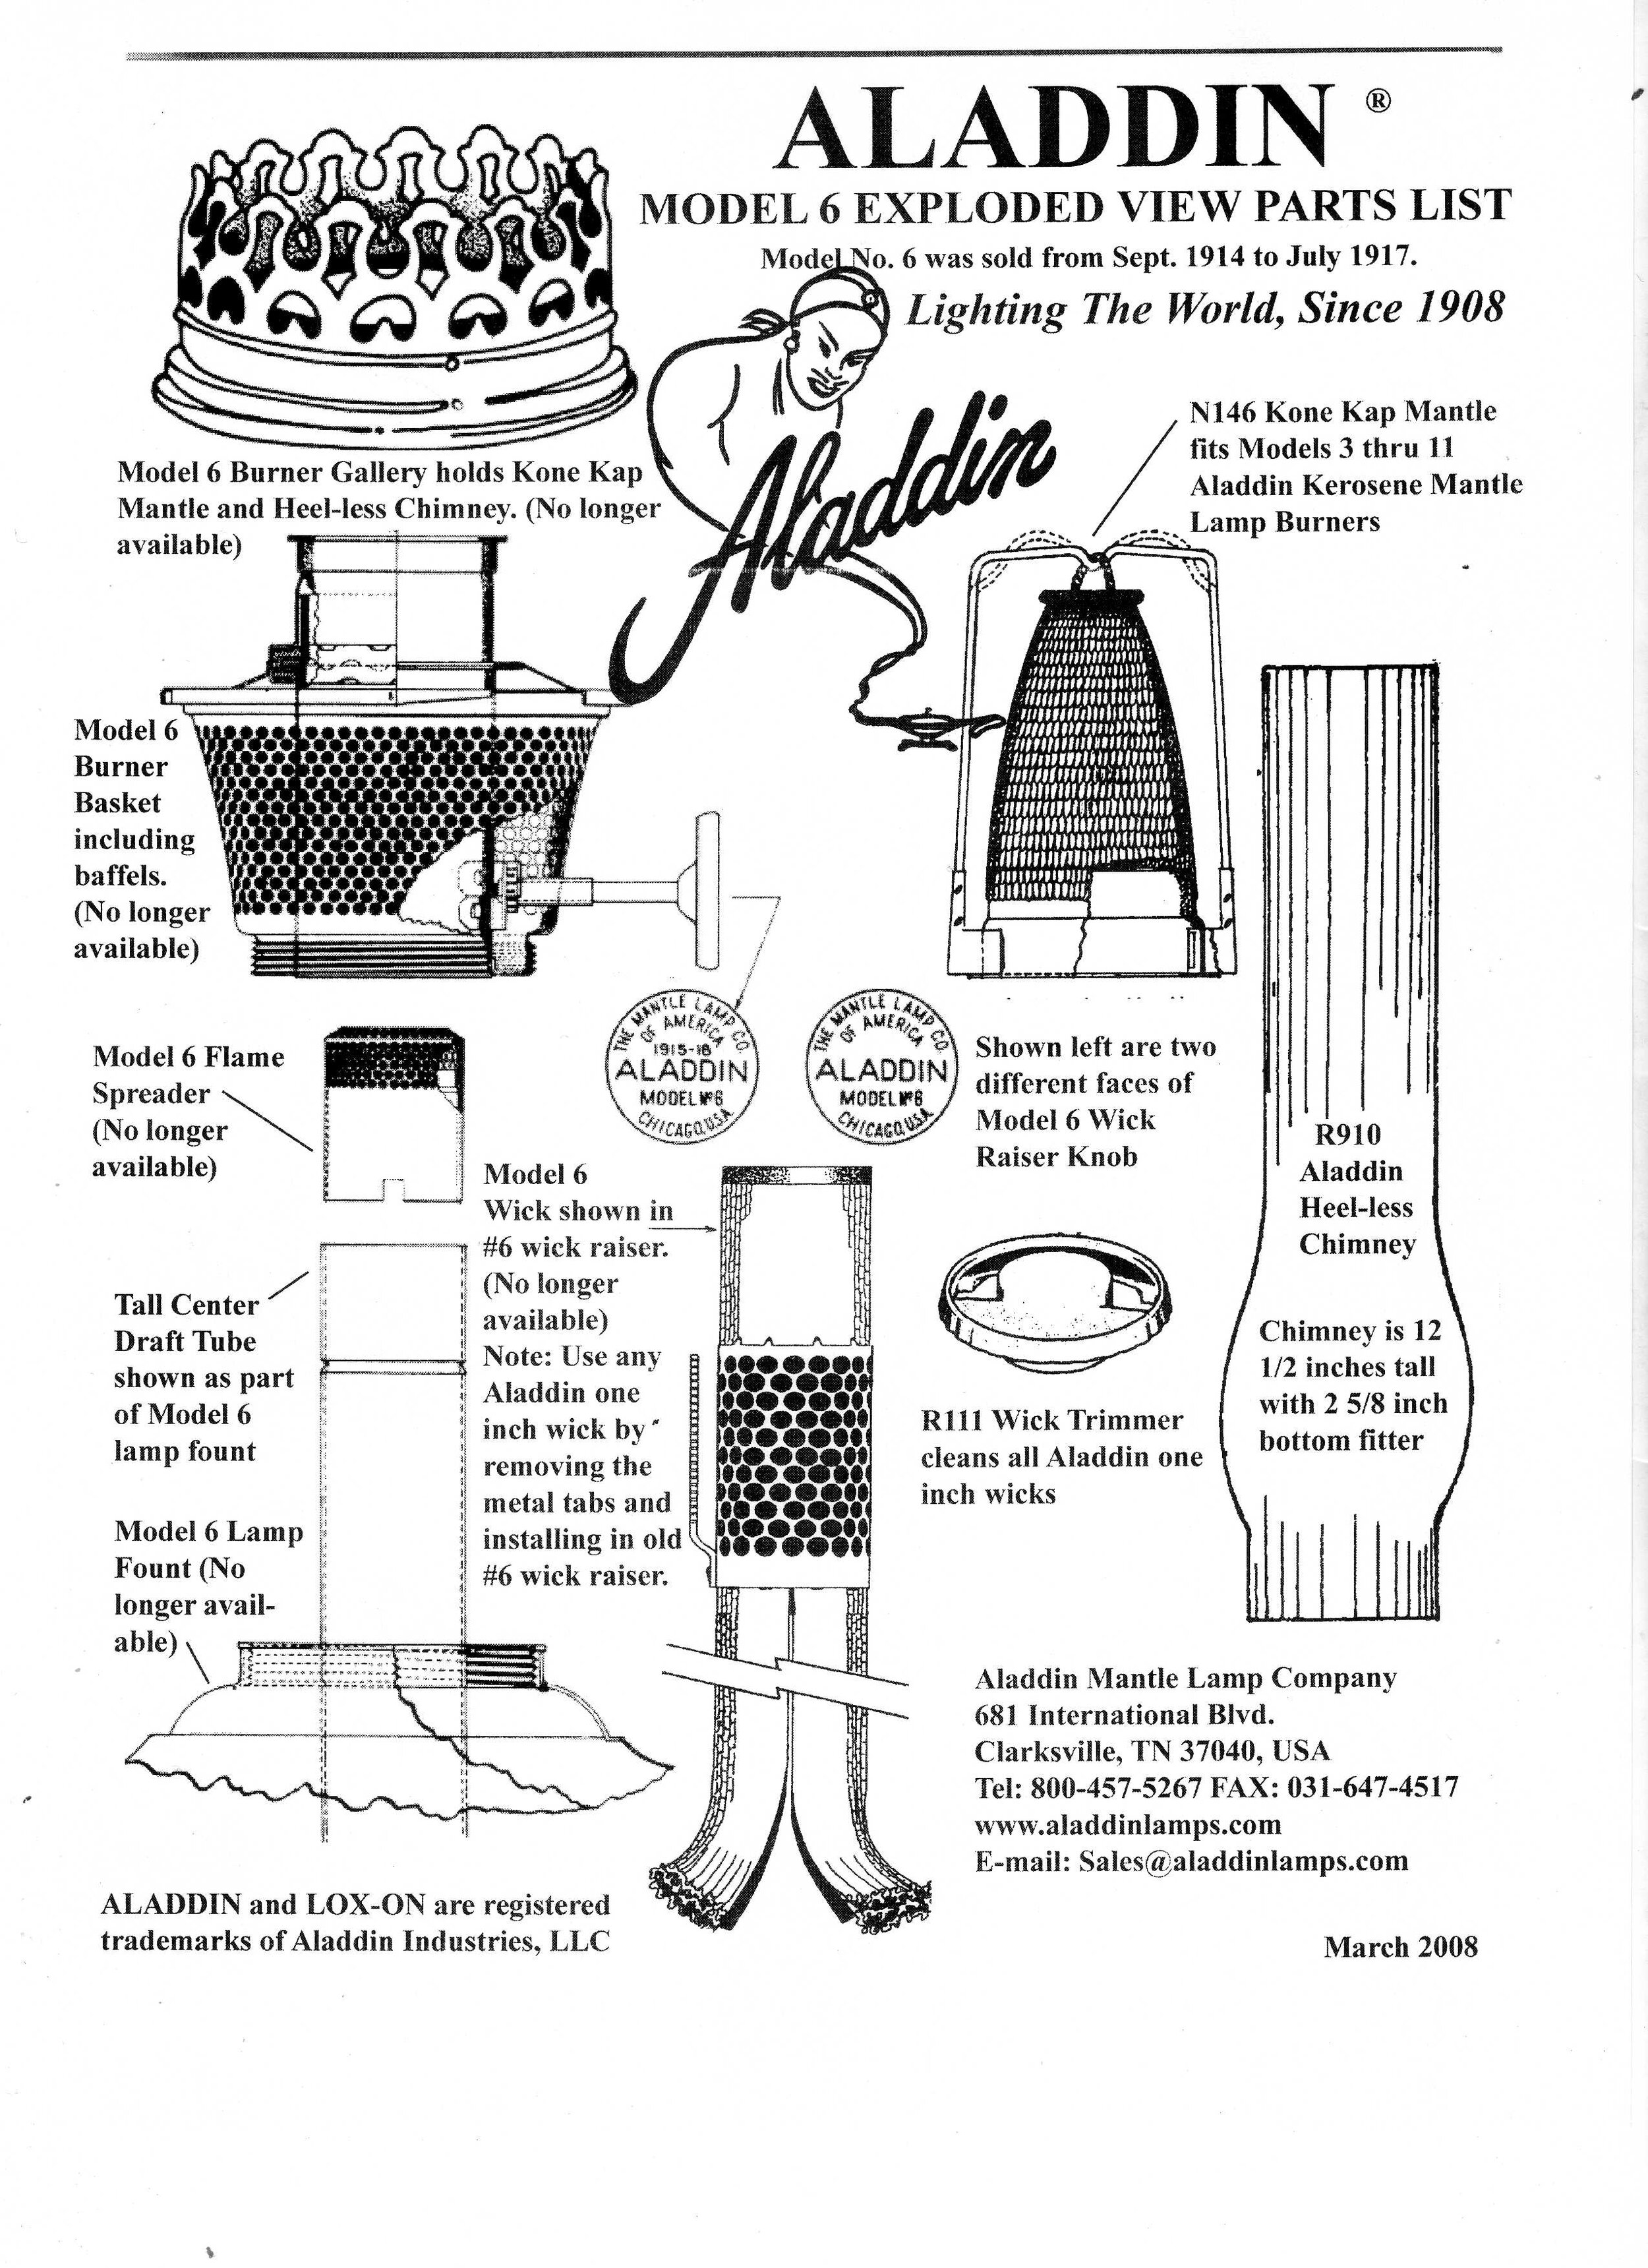
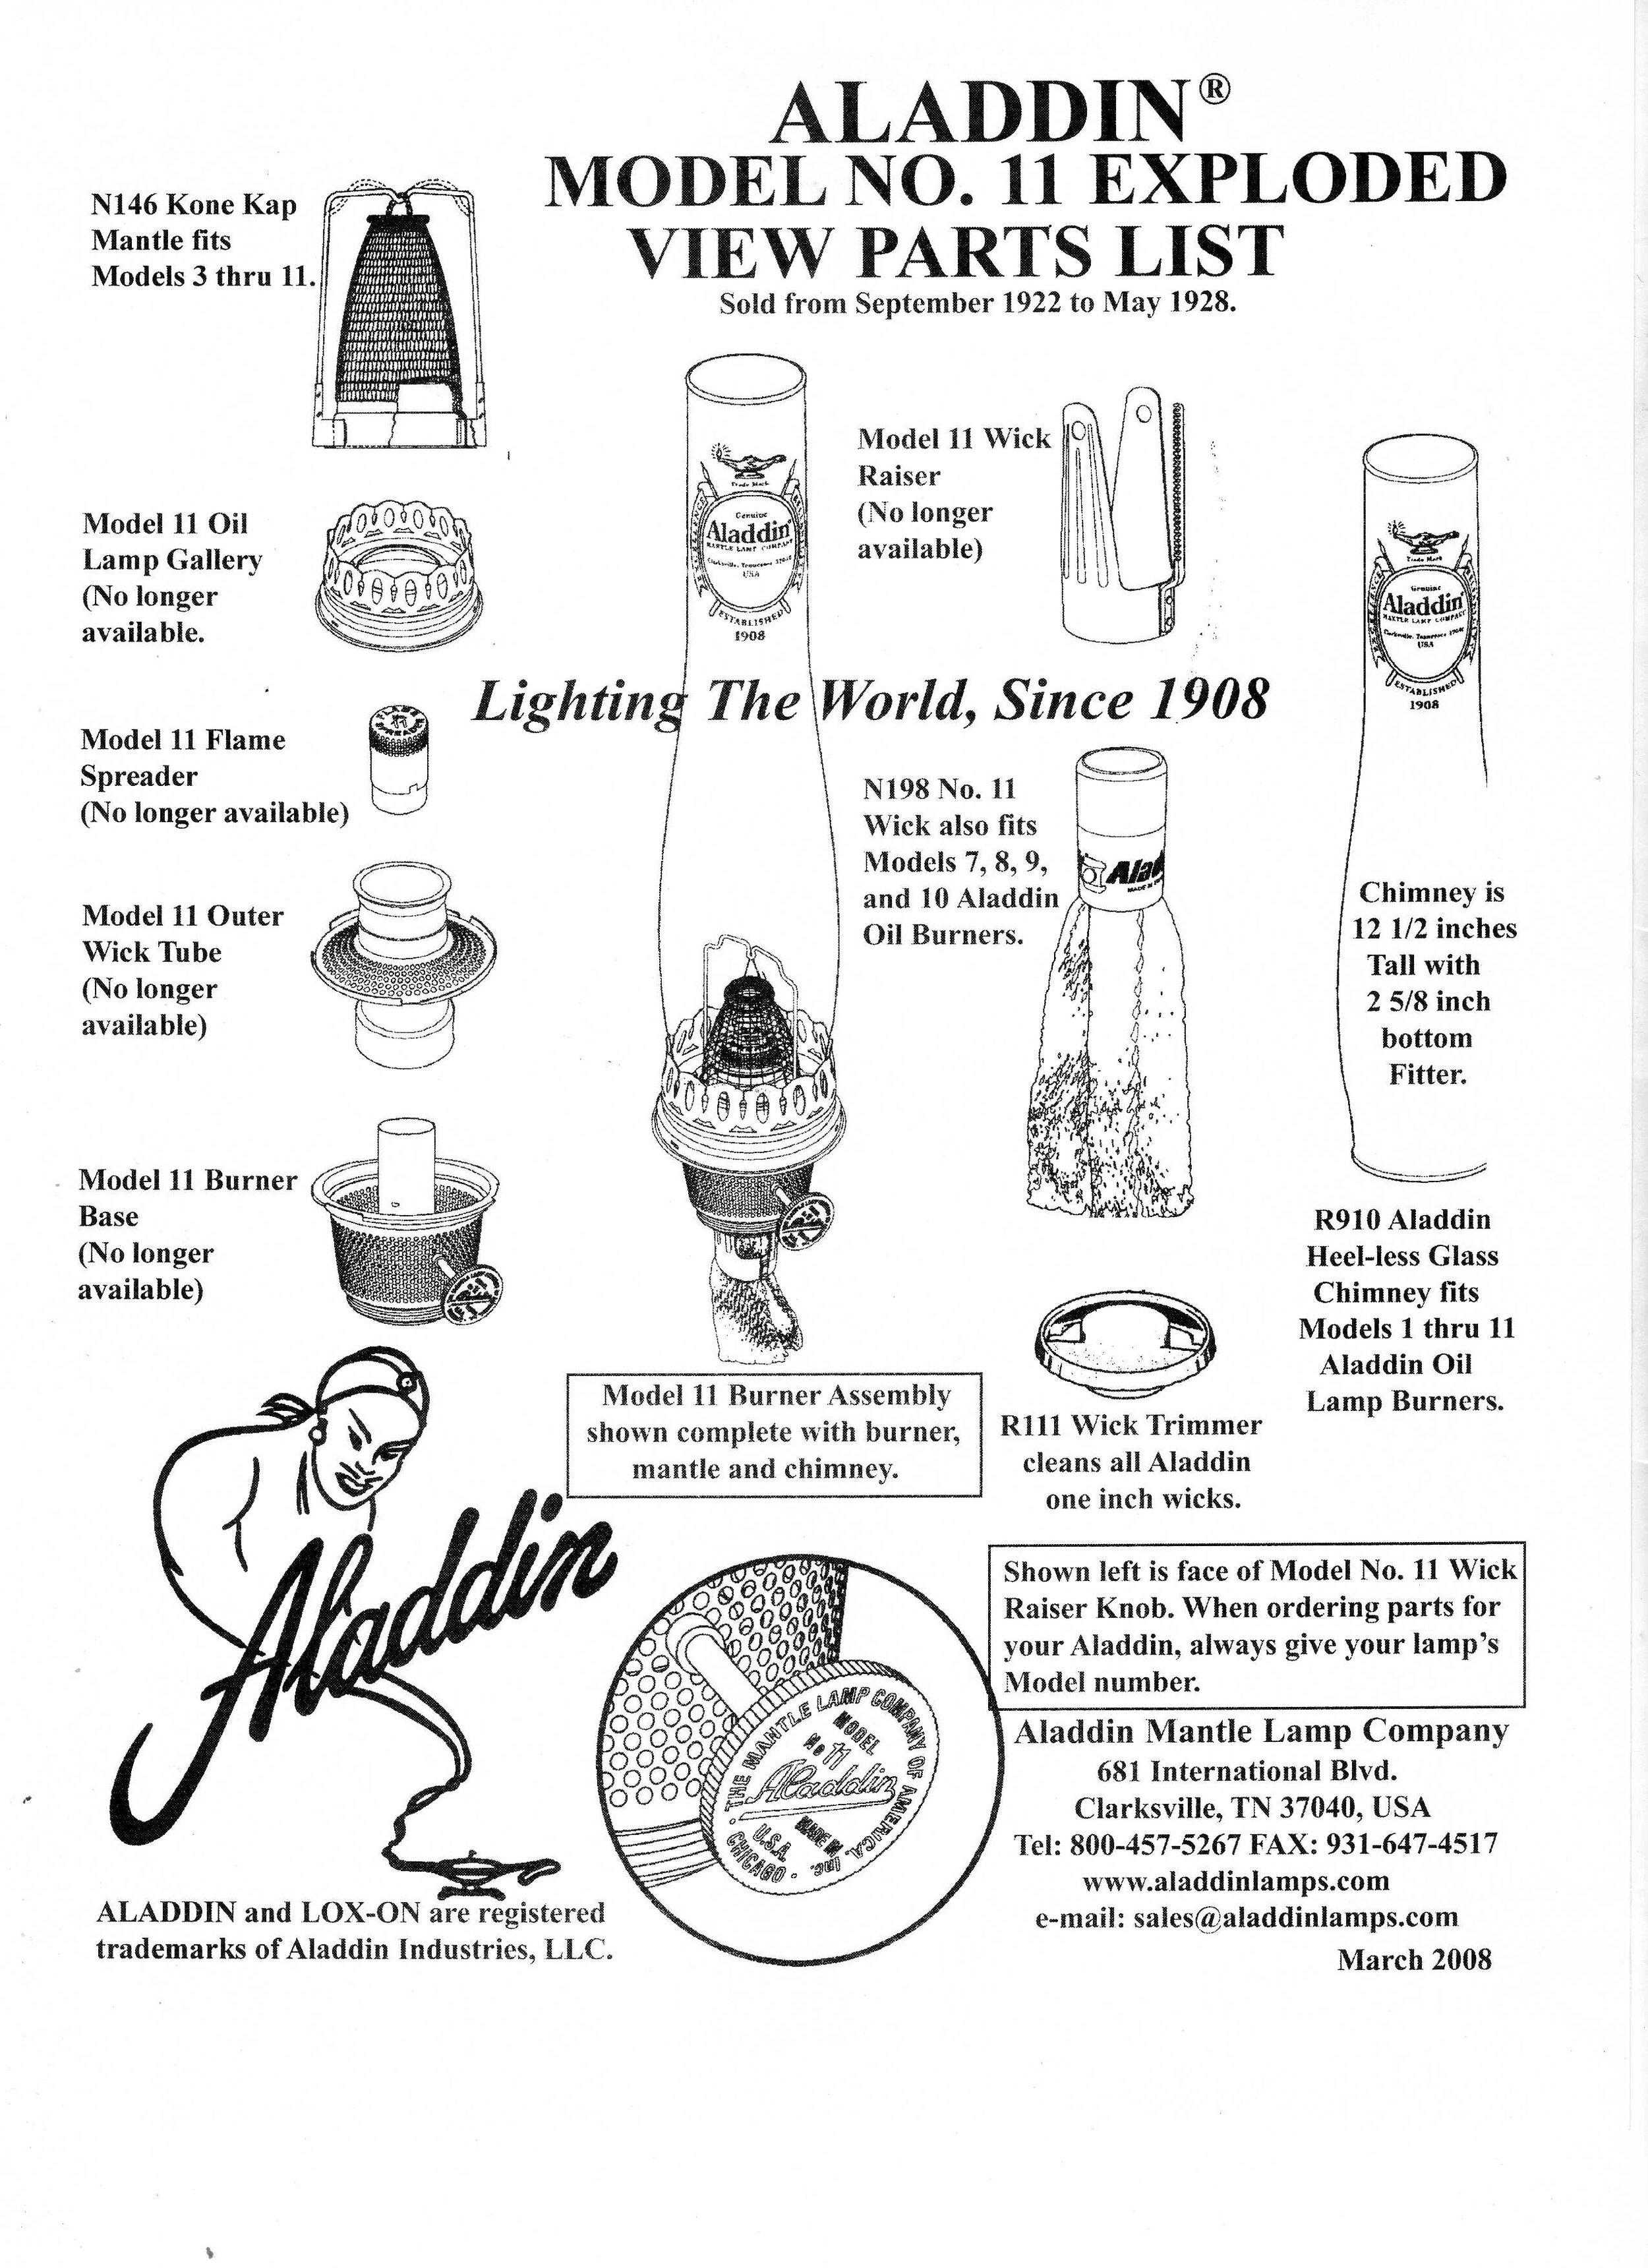
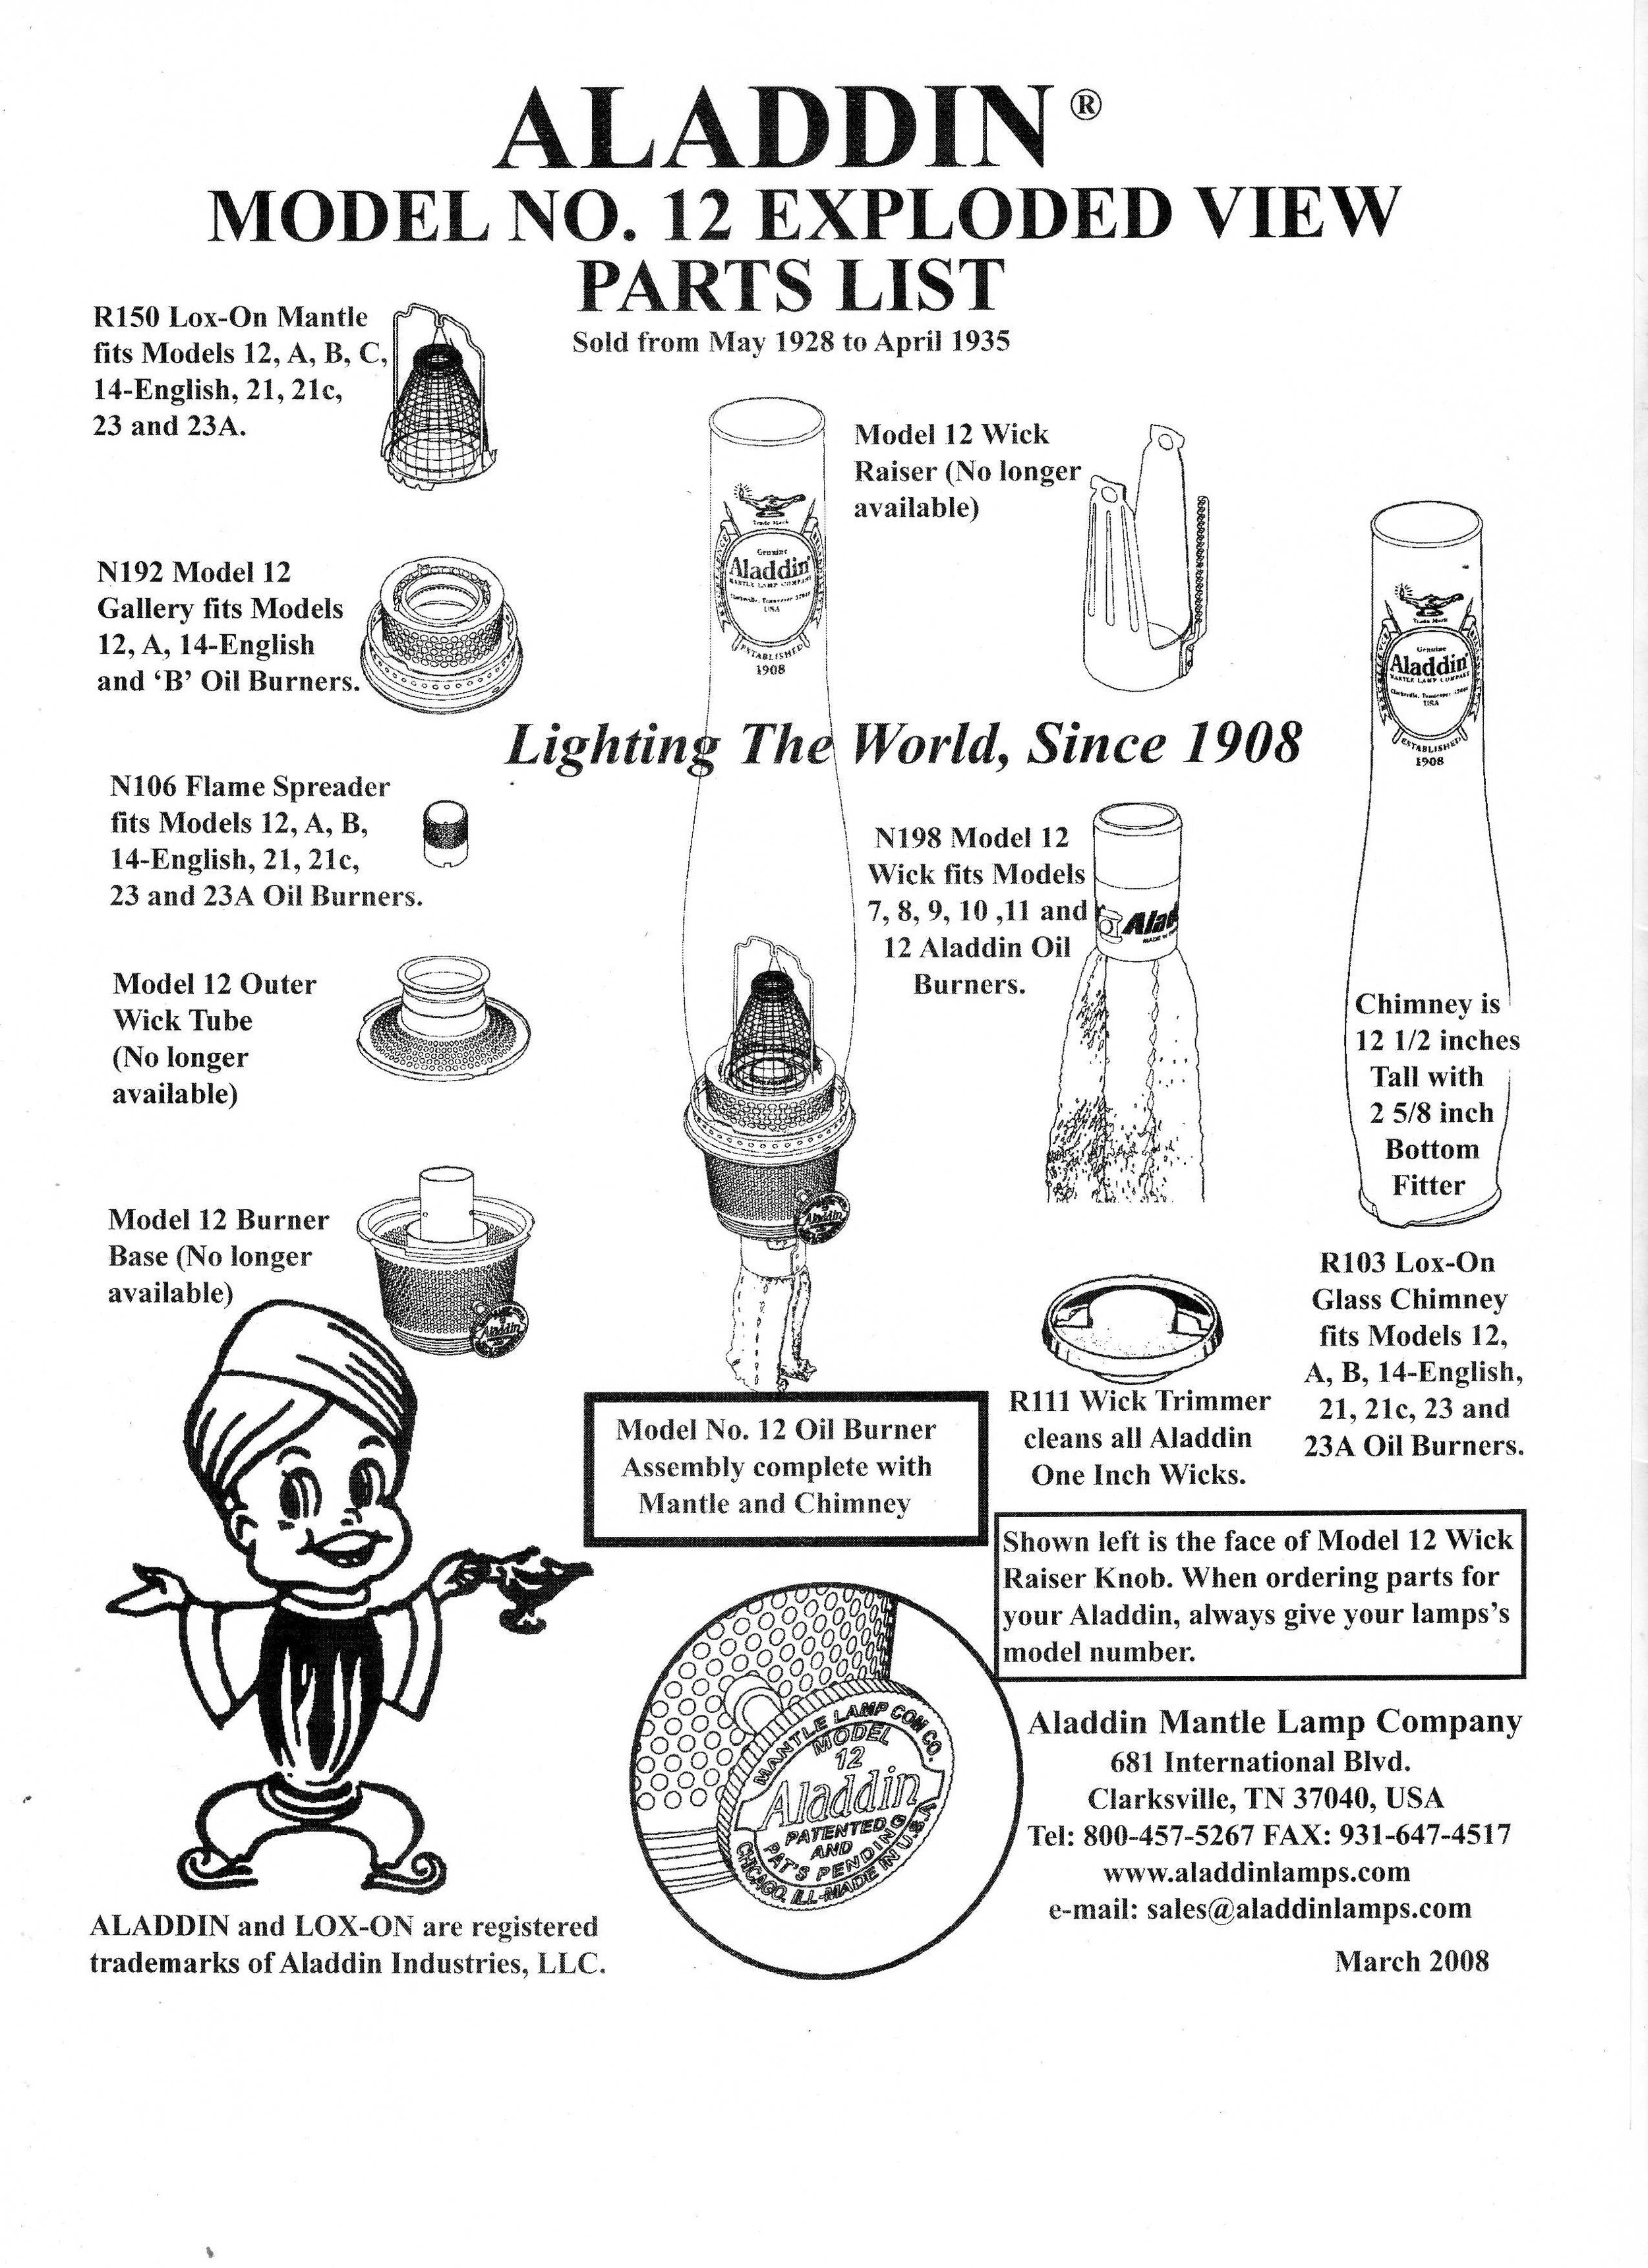
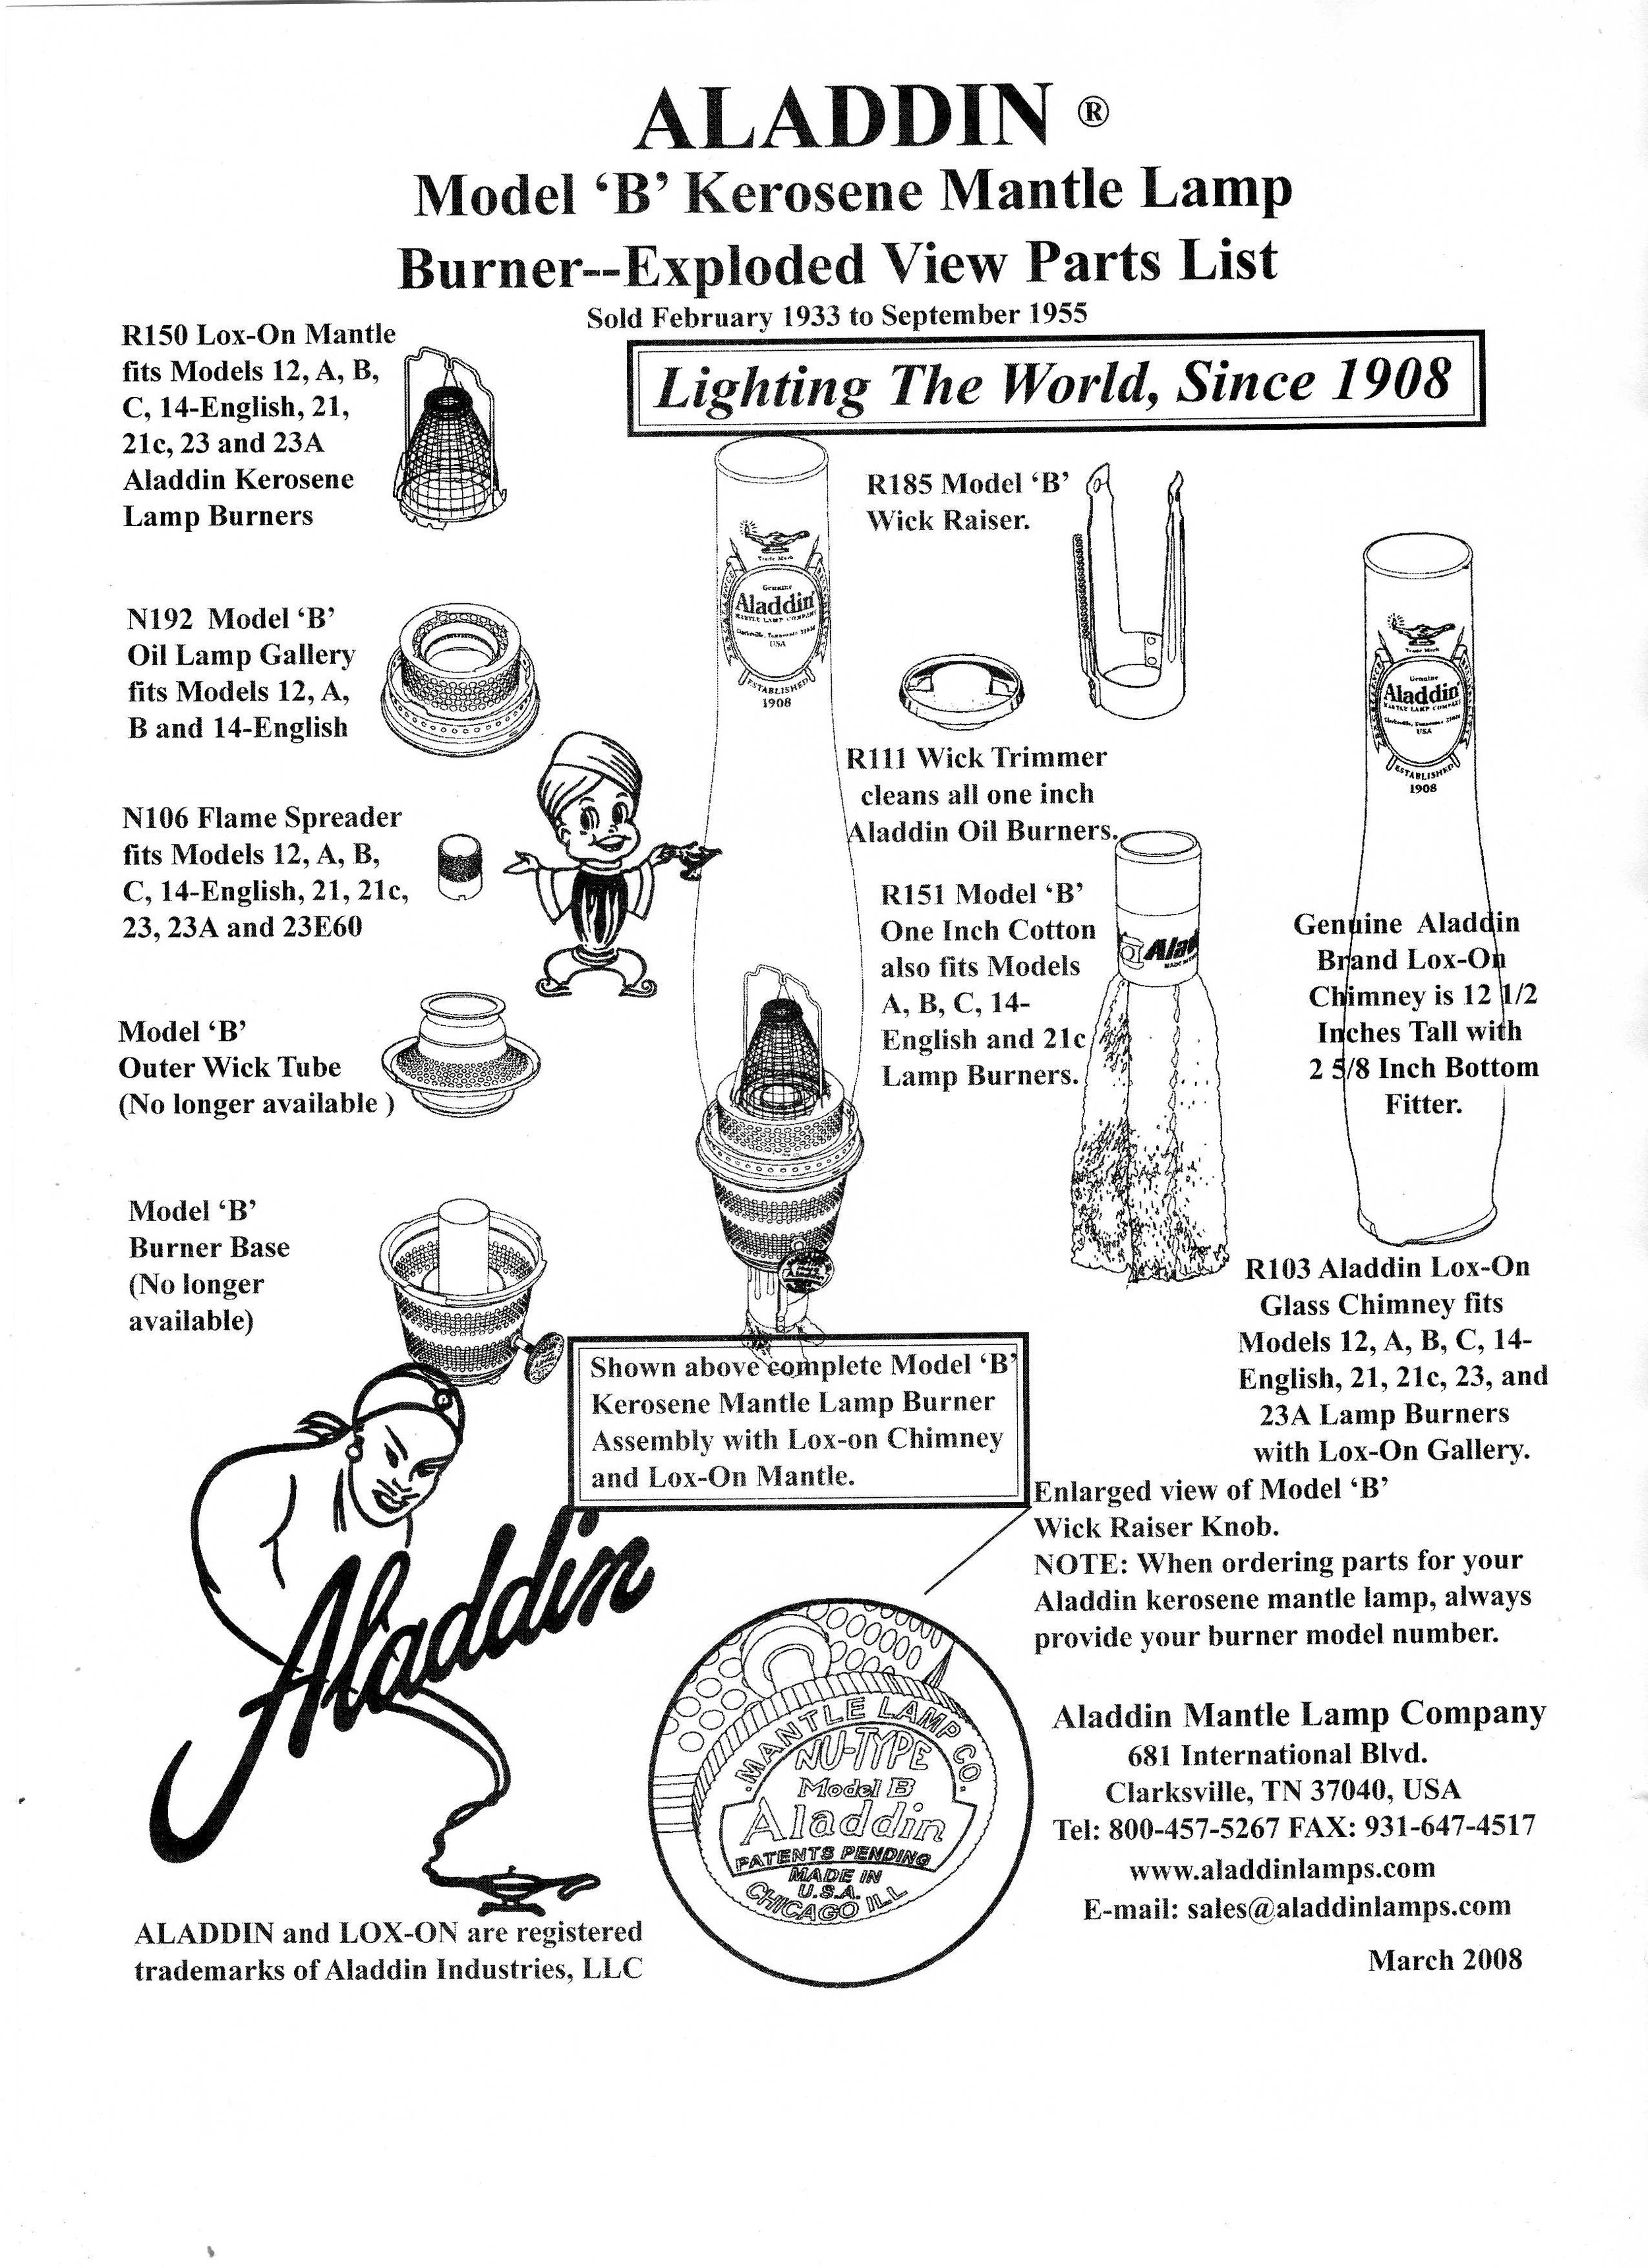
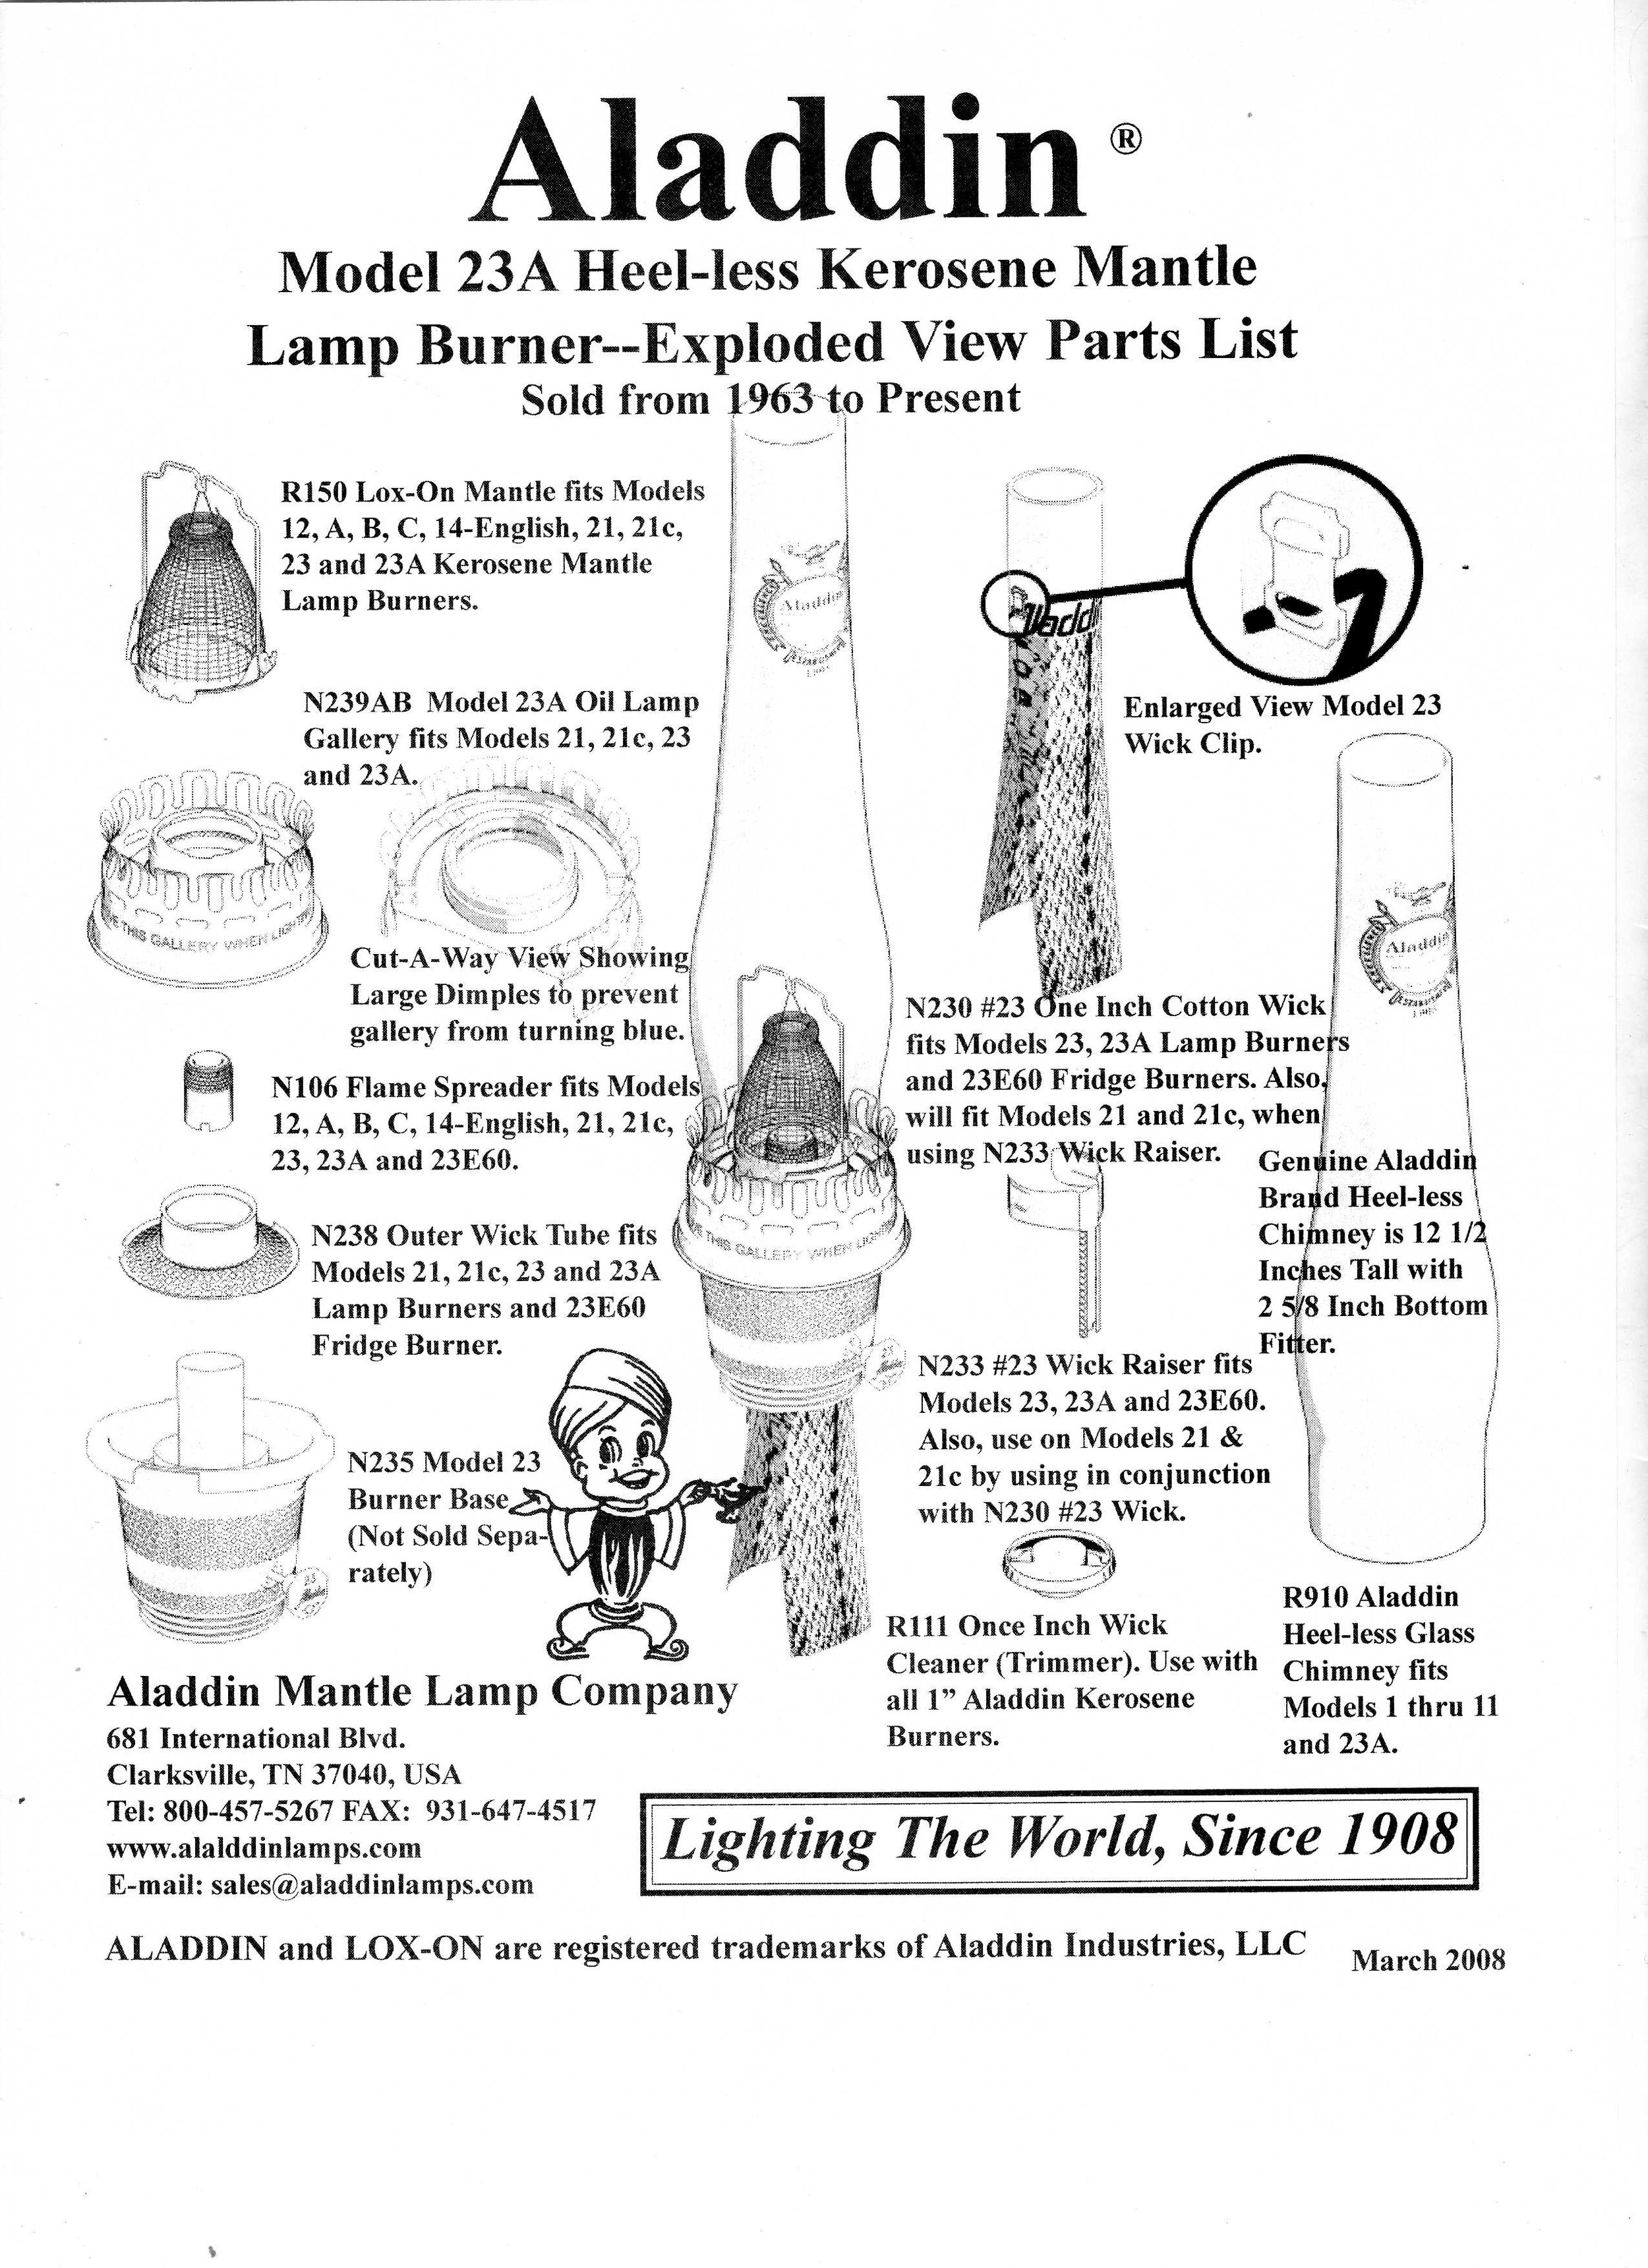
Exploded Aladdin Burner Parts Diagrams Model #6, #11, #12 , B, 23 & 23A
Supplied thanks to The Aladdin Mantle Lamp Co. Clarksville TN
View fullsize
Model #6
View fullsize
Model #11
View fullsize
Model #12
View fullsize
Moel B
View fullsize
Mode3l #23
View fullsize
Model #23A